
The Rules How to Paint Bike Frame
One of the most frequently asked questions is how to paint a bicycle frame? Here is the complete guide to help you finish the paint job and make your bike look like new again.
Bike Frame Disassembly:
No matter how tempted you are to start painting the mountain bike frame without taking it apart, never do it. You will ruin the whole look of your bike and regret it later. The first thing you should do while painting the frame is disassemble the bike until you have the bike frame.
Everything connected to the frame must be removed. This includes the seat, wheel chain, derailleur, and everything else. To remove them, you will require:
Chain tool
Allen Welnch (4mm, 5mm and 6mm)
Pipe wrench
Crescent Crench
For painting, you will need a clear coat. I used to:
Blue Krylon Dual
Krylon Clear Coat
With these tools, get there. The great thing about bikes is that every part you'll need to take off is easy to find. Do you have a hole that can be used to use an allen wrench? Well, use an allen wrench! This will require checking the disc brakes and bar stem and bottle holders. Use the socket wrench to get rid of the arms and the crescent wrench to remove the front fork and the chain wrench to repair the bike chain.
If you are just beginning to learn about this, be sure to be careful with all the pieces you remove as you will be required to return them later. Be sure to take care to store all the pieces. It is easy to drop small pieces on the way.
Clean the MTB frame:
Before you start painting the bike frame, you should clean it thoroughly to remove any grease or dirt. This cleaning can be as simple as using a damp cloth on the frame. But in some cases, you may also need specific agents to remove grease. The condition in which you keep the bike would be the main determinant here.
Read also: how to build a bicycle frame?
Use sandpaper:
You will have to shake off the old paint, so the new paint can fit on it. Rub the frame with sandpaper and you'll get the job done. Don't rub too hard to remove all the paint; A few minutes of scrubbing will do the job.
The grit I chose was 150 but I could have used even finer. The idea is to give the paint a smooth surface to cling to but not to remove all the previous paint.
Cover everything you don't want to paint:
There may be bike logos or stickers that you don't want to ruin with new paint; you can cover them with anything, so the paint doesn't touch them. Duct tape or shopping bags might be the right props to hide all these bike components.
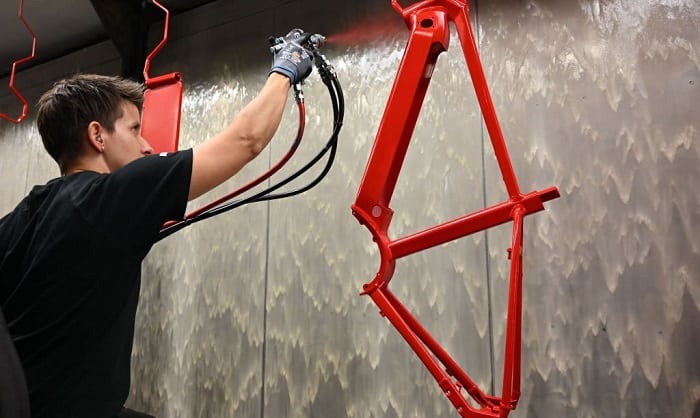
Painting:
Now it's time to paint. You can hang the whole frame with something to get a clear shot. If you don't have a good place to hang the frame, you can place it on the floor (don't forget to cover it with paper or a plastic sheet).
Apply at least 3 coats of paint. Once done with each coat, wait 5 minutes and let the first coat dry.
Read also: how to weld a bicycle frame?
Spray Can vs. Spray Painting Gun
Painting is simple, however, an important tip is to spend time evaluating the most efficient method to accomplish this task. Spray canisters are the least expensive method of making frames look brand new, but not everything that sparkles is gold. . In fact, the uniformity of the spray produced and the quality of the coating are factors that could adversely affect the final result of painting and can increase the chance of making mistakes significantly. Moreover, their cost is not that cheap either! A slightly more expensive investment will provide you with a small air compressor and a wheezing gun. This option will be able to set the amount of air that escapes the gun and disperses over the entire coat.
Painting tips
Whichever way you prefer, once you have selected the paint tool begin through the surface until it is covered the entire surface with a light coat of paint. Still not seeing that first shade? Don't worry, the best technique is to apply a few thin coats instead of one thick layer. Take 20 minutes between each application; you will only achieve the quality goal if you adhere to the drying time. There is no fixed amount of thin coats, it is a matter of continuing until the previous frame is fully coated. Be patient and you will be repaid. More important when painting, move the spray source to the maximum extent without simultaneously getting close enough to the frame to avoid drips.
Once the frame is fully coated and dry, finish the job using a clear coating What is the best method to protect the bike from corrosion and keep it shiny? Repeat the process, allowing time between each application and repeat the process three times.
Now your bike will be set to rest for 24 hours and dry perfectly.
Bike reassembly
Start by removing the painter's tapes that you previously put on and if you have completed the registration procedure, you are should not be able to see any coffins. The entire components you removed before you put it on the back. Front forks and seat, handlebars, brakes, the left and right hand harden rear and front derailleurs, as well as the lower bracket and wheels.
Take a bike ride and ride your fancy new bike!
The bike frame is ready:
Allow the paid to dry completely before reinserting the other parts in their position. This will not take much of your time. Your old bike with new paint is ready for Rick.