
how to change a gravel bike inner tube
how to change a gravel bike inner tube
Discover how to change a gravel bike inner tube quickly and independently. This practical guide shows you all the steps to replace the gravel bike inner tube without mistakes, even during your off-road rides.
Preparation and Essential Tools
What you need to change an inner tube
Before you start replacing the inner tube, make sure you have all the necessary tools at hand. The main item is, of course, a new inner tube of the correct size for your gravel bike. Check the wheel diameter (e.g., 700c) and the tire width indicated on the sidewall of your tire.
Other essential tools are two or three sturdy tire levers, a portable pump, and a patch kit for emergency repairs. Don't forget to check the valve type (Presta or Schrader) on your rims to buy a compatible inner tube.
Safety first: preliminary tips
Choose a flat and stable place to work, away from traffic. If you're on the road, move the bike to a safe spot. It's good practice to wear gloves to protect your hands during maintenance. Make sure your bike is well supported, preferably with a stand, to prevent it from falling during the process.
Before starting, remove any sensors or devices from the wheel. Always remember to let all remaining air out of the punctured inner tube before attempting to remove the tire. This step makes subsequent operations much easier.
Step-by-Step Guide to Replacing the Inner Tube
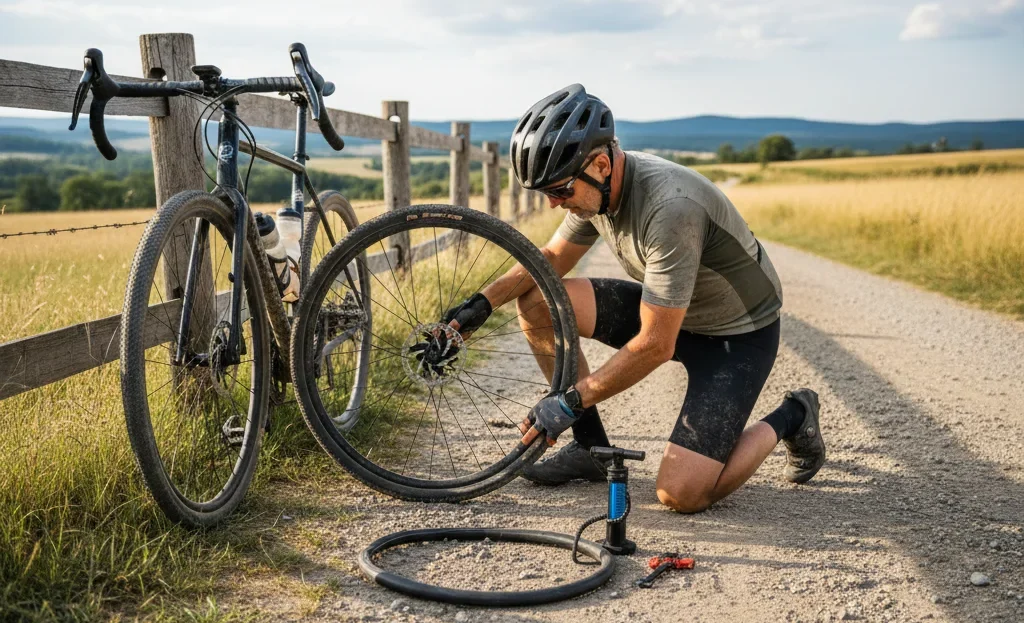
Removing the wheel and taking off the tire
First, shift the gear to the smallest chainring if you need to remove the rear wheel. Open the brake or quick-release mechanism to free the wheel. Once released, gently remove the wheel from the frame, being careful with the spokes and rim.
Place the wheel flat and fully unscrew the valve nut. Use a tire lever to hook the tire bead under the rim edge. Pry gently and hook another lever a few inches away. Slide one lever along the entire rim to unseat one side of the tire.
Inspecting the rim and inserting the new inner tube
Once one side of the tire is removed, take out the damaged inner tube. This is the perfect time for a thorough inspection. Gently run your fingers inside the tire to look for thorns, glass, or sharp objects that could cause another puncture.
Also check the inside of the rim, ensuring the rim tape is intact and smooth. Take the new inner tube and inflate it slightly to give it a circular shape. Insert the valve into the rim hole and place the rest of the tube inside the tire.
Reassembly, inflation, and final checks
Start repositioning the tire bead onto the rim using your hands. Work progressively from both sides of the valve toward the opposite point. The last few inches may be tough: avoid using levers to prevent pinching the new inner tube.
Before fully inflating, make sure the tire is seated properly and the inner tube is not trapped. Use the pump to reach the recommended pressure, indicated on the tire sidewall. Finally, remount the wheel on the frame, tightening the quick release well and closing the brake.
Useful Tips and Flat Prevention
Choosing the right inner tube for your gravel bike
The inner tube sizes must exactly match your tire dimensions. A tube that is too small risks tearing, while one that is too large will fold and cause problems. For gravel, latex or butyl inner tubes are common choices, offering a good compromise between weight and durability.
Also consider the tubeless option, a system that eliminates the traditional inner tube using a liquid sealant. The tubeless setup can drastically reduce the risk of punctures and allows you to ride at lower pressures, ideal for comfort on dirt.
Techniques to prevent future flats
Prevention starts with correct tire pressure. Too low pressure exposes you to the risk of a pinch flat, while too high pressure makes the tire more vulnerable to impacts. Regularly inspect the tire for wear and replace it when the tread is worn.
You can apply a puncture-resistant protective tape inside the tire or opt for tires with a reinforced construction. While riding, try to avoid sharp debris and roadside ditches where glass and thorns accumulate. These habits are an integral part of good gravel bike maintenance.
Maintenance and regular checks
Always include a spare inner tube, tire levers, and a multi-tool in your repair kit. Before each ride, take a minute to visually inspect the tire and rim. Check the pressure with an accurate gauge, as an integrated pump is often not precise.
After every ride on rocky terrain, clean the tires and check for any embedded objects. Learn to repair punctures with patches for emergencies, but remember that replacing the inner tube is the fastest and most reliable solution when you get a flat on the road. With these precautions, you can enjoy gravel cycling with greater peace of mind.
Read also:
| Mountain Bike Offers |
| MTB 27.5 on Offer End of Series |
| Most Popular Cycling Places on Lake Garda |
❓ Frequently Asked Questions
How long does it take to change a gravel bike inner tube?
Changing a gravel bike inner tube generally takes between 10 and 20 minutes, depending on your experience. With practice, you can complete the operation in as little as 5-7 minutes during emergency roadside stops.
What size inner tube is needed for a gravel bike?
The correct size of a gravel bike inner tube depends on the wheel diameter (usually 700c) and the tire width, indicated on the tire sidewall. Also check the valve type (Presta or Schrader) compatible with your rims before purchasing.
Can I repair a punctured inner tube instead of replacing it?
Yes, you can repair a punctured gravel bike inner tube using a patch kit, ideal for small punctures during rides. However, for extensive damage or multiple punctures, it is advisable to completely replace the inner tube to ensure greater reliability.
What tools are needed to change the inner tube on a gravel bike?
The essential tools are: a spare inner tube of the correct size, 2-3 sturdy tire levers, and a portable pump. It is also useful to have a patch kit for emergencies and gloves to protect your hands during maintenance.
How can I avoid puncturing the newly installed inner tube again?
Before inserting the new gravel bike inner tube, carefully inspect the inside of the tire and the rim to find thorns, glass, or sharp objects. Also, check that the rim tape properly covers the spoke holes to prevent punctures from the inside.
💡 How to change a gravel bike inner tube
7 Steps
- Prepare necessary tools and materials
Gather all essential tools: a new inner tube of the correct size (check the diameter and valve type on the tire), 2-3 sturdy tire levers, and a portable pump. Ensure the inner tube is compatible with your rim's valve (Presta or Schrader). Place the bike on a flat, safe surface, preferably using a stand. - Remove the wheel from the frame
If you need to remove the rear wheel, shift the derailleur to the smallest sprocket to make the operation easier. Open the brake or quick-release mechanism and gently slide the wheel out of the frame. Fully unscrew the valve nut and let all remaining air out of the punctured inner tube. - Remove the tire and the damaged inner tube
Insert a tire lever under the tire bead and pry it to hook it onto the rim edge. Place a second lever a few centimeters away and slide one of the levers along the entire rim to completely unseat one side of the tire. Remove the damaged inner tube from the tire. - Inspect the rim and tire
Carefully check the inside of the rim and tire for any foreign objects, thorns, or sharp items that caused the puncture. Run your fingers cautiously along the entire inner surface of the tire to detect sharp elements. Remove any debris or dangerous objects before proceeding. - Insert the new inner tube
Slightly inflate the new inner tube to give it shape, without overdoing it. Insert the valve into the rim hole and place the inner tube inside the tire, distributing it evenly around the entire rim. Ensure there are no folds or twists in the inner tube. - Remount the tire onto the rim
Start by fitting the tire bead inside the rim, beginning from the side opposite the valve. Proceed with your hands by pushing the bead inward, avoiding the use of levers to prevent pinching the inner tube. For the last few centimeters, push the valve inward to facilitate the complete insertion of the bead. - Inflate and remount the wheel
Gradually inflate the inner tube while checking that the tire sits correctly on the rim without abnormal bulges. Reach the recommended pressure indicated on the tire sidewall. Remount the wheel on the frame, close the quick-release mechanism, and reactivate the brake, ensuring everything works properly before riding again.