How to choose a splitboard?
What is splitboard and how to choose a perffeto splitboard.
- Length
- Camber and Rocker
- Form
- Width
- Flex
- Materials
An easy guide to buying a splitboard?
- Splitboard for long backcountry/mountaineering tours: if your goal is to reach big peaks or delve into the backcountry, you will gain a lot of elevation and travel many miles. Choosing a lighter splitboard will help you travel more efficiently and save energy. A board built with carbon fiber is the lightest choice, but it can cost you. If you can't afford it, opt for a lighter board made of fiberglass. Pay attention to board shape and profile Consider a board that has a directional design with a camber or camber/rocker profile. These features tend to give more edge grip and efficient uphill performance than boards with the twin tip shape and a lot of rocker.
- Splitboards for deep surfing Powder-oriented boards are generally wide at the front and taper toward the tail. Their directional or directional/gemello design and rocker aisles give excellent float on powder. Some powder splitboards are smaller than a standard snowboard, but a little larger, which means they have a large surface area to provide good flotation.
- Splitboards suitable for all-mountain riding They can cover the full spectrum from directional twin tip, cambered and rocked. Because everyone prefers something unique, deciding on the best snowboard for all-mountain biking can be difficult. We suggest you start with a look at the type of snowboard you currently use. If you are happy with your board and feel comfortable riding it through the resort, look for an equivalent splitboard.
Split board length
Table of snowboard sizes
- If you own a powder or freeride snowboard and like the way it moves, you will be pleased with the similar size of the splitboard.
- If you are riding an inbound freestyle board, you can upgrade to a splitboard that is a few inches larger to provide more performance on soft snow.
- A longer splitboard will support the weight of your body and equipment more effectively than a smaller one to provide superior flotation on soft snow. When you go uphill, the extra length allows for better glide, which means better efficiency while skiing.
- A shorter board is generally lighter than a larger one, which will benefit you when you undertake trips that involve a lot of climbing.
- A shorter board can be more maneuverable, which makes it much easier to take detours when skinning and maneuver between trees when going downhill.
- If you're looking to buy a single splitboard that can handle anything from powder to spring snow, think of a mid-range length that can find the right middle ground between maneuverability and flotation.
Splitboard Camber and Rocker
Camber

- Excellent grip The continuous edge contact offered by the camber provides excellent edge grip, especially on harder snow. This is evident both downhill and uphill.
- Stability when the wheel turns: good edge grip gives you a feeling of safety when turning.
- Excellent control at speed: Cambered boards have a solid feel that allows them to handle fast, intense, high-speed riding.
- A lower level of flotation in powder Without the board's turned-up nose and tail being rockered, those cambered generally do not float the same in deep soft snow, either when going up or down. However, with proper techniques, cambered snowboards can be used in powder.
Rocker
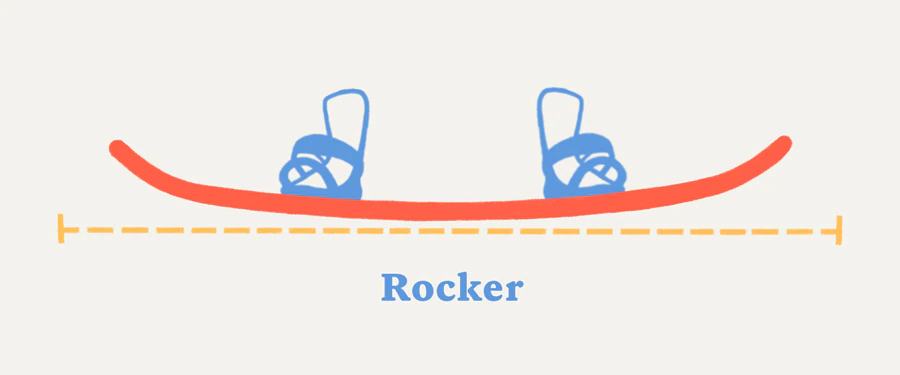
Pros:
- Good flotation on the soft winter snow. A tail and nose rising off the ground, a snowboard rocker keeps you on top in the powder.
- Good maneuverability: less edge contact allows easy and agile turns.
- Edge control is inferior: the benefit of excellent maneuverability comes at a cost; less edge contact can mean less control and grip on harder snow, regardless of whether you are riding downhill or climbing a steep slope during skidding.
- Skinning with less grip: many things affect grip while skinning, including your technique, the quality of your climbing skin, and snow conditions, so the profile of your board is not entirely to blame for sliding. In general, rocker splitboard can provide less skin-to-snow contact than cambered board because of the way the tail and nose lift off the snow.
Camber/Rocker

- Excellent flotation Although not as noticeable as a full rock snowboard, the rocker on the tail and tip of the snowboard allows the board to stay afloat on soft snow.
- Excellent edge control The camber underfoot offers some of the edge-holding properties of the fully cambered board.
- Good grip when the skin is removed: camber under the foot maintains good skin-to-snow contact ensures solid skin.
Splitboard shape
- Directional These boards typically have more of a nose and a shorter tail, making them ideal for going in one direction. The asymmetric flex on these boards is typically stiffer at the tail for excellent carving and softer at the tip for excellent float. This makes them ideal for high-speed carving and powder riding.
- Directional twins: these boards are similar to true twin snowboards (those that have a completely uniform shape and flexibility). They are extremely versatile boards that can be used all over the mountain and in a variety of conditions. If you enjoy riding the twin or even a directional snowboard and are looking for the same freedom of movement when going into the backcountry, the directional twin might be a great option.
- True twin You are likely to come across an equidistant, fully symmetrical twin splitboard that has a centered position. If you are interested in having a true twin-twin snowboard but want one for the backcountry, the best option is to choose one that is directional, designed specifically to be ridden with a switch. It also has a low setback in place.
Splitboard width
- When your table is not wide enough: you may not be able to get enough leverage to move effortlessly between edges and others.
- The board is not tight enough: your toes and heels are too high and you may end up sliding them into the snow as you turn. This can make you lose control.
This table provides an approximate waist width for men's and women's boot sizes:
TABLE
TABLE
It is important to note that there are some split boards that are much wider than what you can see above. For example, some are over 320 mm wide at the top, 275 mm wide at the waist and 300 mm wide at the tail. They are specifically designed to give you the best possible flotation in extremely deep powder. Since these powder-specific boards are so large that snowboarders are likely to use a shorter length than a standard freeride board, so be sure to pay close attention to the size chart.
Additional splitboard features
FLEX

Upper sheet materials
- The fiberglass Is often used as a topsheet. It is inexpensive and can be used in various ways to achieve specific bending characteristics. However, fiberglass is heavier and less rigid than carbon.
- Carbonis used in a number of premium splitboards to reduce weight and improve stiffness. Adding carbon could also significantly increase the cost, so it is important to consider whether you really need it. If you plan to tackle a lot of long-distance treks with a lot of elevation gain, the weight reduction of carbon might be worth the additional cost.
Connecting hardware
- Some clips allow you to adjust their tension so that you can limit any potential play that might be created over time. This allows you to keep the two halves of the board tightly connected.
- Some clips rotate sideways to ensure that they do not break or become entangled with something during skinning.
- Traditionally, board manufacturers were required to drill holes in the board to place the clips, leaving the bolt head on the base. However, some manufacturers are thinking of strategies to prevent this from happening, resulting in a smooth base to provide maximum ride quality.
- If you decide you don't like the clips that came with your card, most are available on the secondary market and can be installed effortlessly.
Skin attachment points
Tail and toe reinforcement
Binding mounting system
- Inserts Most splitboards are equipped with inserts with pre-drilled holes. They are simple and reliable and can accommodate any available splitboard mount. The standard mounting pattern provides
- channel supports some models of boards have channel systems rather than pre-drilled inserts. It is evident through the four slots that run in parallel with the boards within the space in which the inserts are mounted. The channels provide a variety of options to really dial in your location. So if you have a wide location or very high angles, you might think about an option with channels.
Frequently Asked Questions:
1: What is a splitboard?
A splitboard is a snowboard that can be split into two skis to allow snowboarders to go up off-piste slopes and then downhill.
2: What are the advantages of a splitboard over a traditional snowboard?
A splitboard provides the ability to explore off-piste terrain more efficiently and offers more versatility when it comes to climbing and descending.
3: What is the ideal length for a splitboard?
The ideal length depends on your height, weight, and personal preferences. Consult an expert to get a personalized measurement.
4: How do I choose the right width for a splitboard?
The width should be chosen according to your boot size. Make sure your boots are well matched to the width of your board.
5: What are the characteristics of a good splitboard?
A good splitboard should have a good profile, strong edges, and a good attachment system.
6: What are the types of splitboard profiles?
Common profiles include camber, rocker, and flat. The choice depends on your riding preferences.
7: What should I look for in a splitboard attachment system?
A good attachment system should be lightweight, durable, and easy to use during the transition from ascent to descent.
8: How do I choose sealskins for a splitboard?
Choose sealskins based on the width of your board and the terrain on which you plan to go.
9: What are the essential accessories for a splitboard?
Essential accessories include a snow shovel, probe, avalanche search device and first aid kit.
10: How much does a good complete splitboard set cost?
prices vary widely, but a complete quality set can cost from several hundred to thousands.
11: What is the required maintenance for a splitboard?
It is important to keep sharp foils and sealskins in good condition. Also, check fasteners regularly and replace worn parts.
12: Can I use the same snowboard boots for a splitboard?
Generally, you can use the same boots, but make sure they are compatible with the splitboard attachment system.
13: What are the safety considerations when using a splitboard?
Safety is critical. Make sure you have the safety equipment to assess and manage avalanche risks.
14: How do I learn to use a splitboard safely?
Take lessons from an experienced instructor and practice in safe terrain before tackling more challenging trails.
15: What are the ideal splitboarding destinations in Italy?
Italy offers many fantastic options for splitboarding, including the Italian Alps and the Dolomites.
16: How much weight can a splitboard carry?
Weight capacity can vary between models, so check the manufacturer's specifications to make sure it fits your body weight.
17: Can I rent a splitboard instead of buying it?
Yes, many locations offer splitboard rental services to allow you to try it out before committing to purchase.
18: What is the difference between a splitboard and a ski mountaineer?
A splitboard is a snowboard that splits into skis, while ski touring involves the use of skis specifically designed for climbing.
19: How long does it take to learn how to use a splitboard?
How long it takes depends on your pre-existing skills and experience on snow, but it requires practice and constant learning.
20: How can I find a group of people to splitboard with?
Join snowboard or splitboard groups on social media or search for local snowboard clubs to find fellow snowboarders.